There’s something undeniably satisfying about a cake with perfectly smooth sides and razor-sharp edges. It’s the hallmark of professional-level decorating and the foundation for stunning finishes, whether you plan to add piping, drips, or edible flowers. Fortunately, achieving this level of polish isn’t reserved for expert bakers. With the right tools, techniques, and a little patience, even home bakers can get that sleek, clean finish. In this article, we’ll guide you step-by-step to mastering smooth sides and sharp edges, transforming your cakes into elegant showpieces.
Why Smooth Sides Matter
A cake with smooth sides gives a neat, modern look and serves as a blank canvas for all kinds of decorations. It enhances visual appeal and makes your cake look more intentional and refined. Sharp edges, in particular, add a crisp professional touch, especially on tall cakes or minimalistic designs. If you plan to decorate your cake with techniques from our recent posts — such as drip cakes (#34), piping decorations (#33), or natural coloring techniques (#32) — a smooth base makes all the difference.
Start with the Right Cake
Before focusing on the finish, it’s essential to start with a well-structured, properly leveled cake. Uneven layers or a crumbly surface will make it much harder to get a clean exterior.
Use a serrated knife or cake leveler to trim domed tops, ensuring each layer is flat. Stack your layers with even filling (review “Layer Cakes 101: Stacking Without Slipping” #28), and refrigerate for at least 20–30 minutes before applying your final coat. A chilled cake is firmer and more stable, making it easier to frost precisely.
Choose the Right Frosting
For ultra-smooth sides, use a frosting that holds its shape but is still easy to spread. American buttercream, Swiss meringue buttercream, or ganache are ideal options. Avoid whipped cream or cream cheese frostings, which are softer and less suitable for sharp edges.
Essential Tools for a Perfect Finish
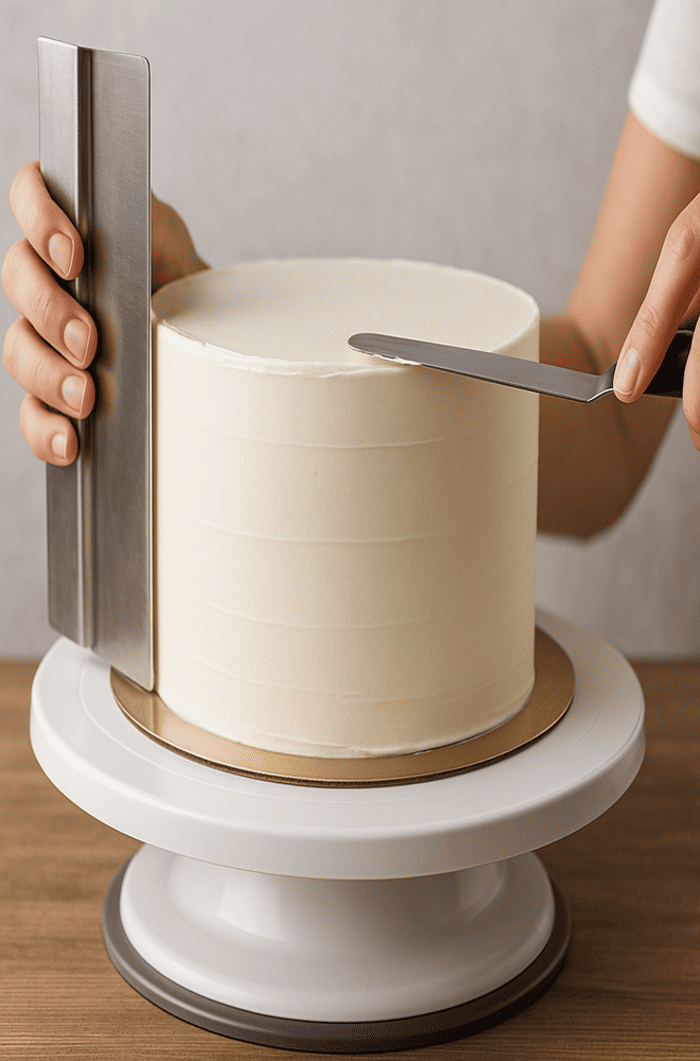
- Offset spatula (small and large): For applying and smoothing frosting.
- Bench scraper (or cake scraper): To create perfectly straight sides.
- Cake turntable: Allows for smooth, continuous movements as you rotate the cake.
- Angled palette knife: Helps with precise control on the top edge.
- Acetate sheet or flexi-smoother (optional): For super smooth finishes.
Step-by-Step: How to Frost for Smooth Sides and Sharp Edges
- Apply a Crumb Coat
Start with a thin layer of frosting to trap crumbs. Use an offset spatula to spread a light coat around the cake. Don’t worry about perfection — this is just the base. Chill the cake for 15–20 minutes to set this layer. - Add the Final Coat
Use a generous amount of frosting and start spreading it evenly with the offset spatula. Work from top to sides. - Smooth the Sides
Hold the bench scraper vertically against the side of the cake and slowly spin the turntable. Don’t press too hard — let the scraper do the work. Remove excess frosting from the scraper each time. Repeat until the sides are even and smooth. - Create Sharp Edges
To get sharp top edges, gently pull the frosting from the top edge inward using a clean spatula or palette knife. Angle it slightly toward the center and glide in one smooth motion. Clean the spatula each time you swipe to prevent buildup. - Refine and Chill
After smoothing, chill the cake for another 10–15 minutes before adding decorations or further layers. You can continue refining with a hot spatula (dip in warm water and dry) for extra smoothness.
Troubleshooting Common Problems
- Air bubbles: Use a spatula to gently pop or press out any trapped air. Chilling the frosting slightly before applying can also help.
- Frosting won’t smooth out: It might be too cold or too stiff. Let it warm up slightly or stir to loosen.
- Uneven sides: Adjust your scraper angle and ensure your cake is level. Build up thinner areas with more frosting and scrape again.
- Top edges look ragged: Clean your spatula often and take your time shaping the edges after the sides are fully smooth.
Advanced Tips for a Flawless Finish
- Use acetate sheets or a flexi-smoother to polish the surface for mirror-smooth results, especially with ganache or Swiss buttercream.
- Try a “double crumb coat” if working with particularly fragile cakes (like carrot or sponge). Apply two thin crumb layers, chilling in between.
- Color the outer frosting with natural dyes or gel colors (see #32) for a vibrant final look.
When to Apply Decorations
Once your cake is chilled and the frosting is set, you can move on to decoration. Whether you’re adding drips (article #34), fruits and flowers (see #38), or building a birthday-themed design (check out #30), a smooth canvas ensures your elements stand out cleanly and adhere well.
Perfect Finish, Better Photos
If you’re building your cake portfolio or selling your creations, smooth sides photograph better — especially under natural lighting. The clean lines and sharp edges pop on camera and communicate quality and skill. For better cake photos, don’t miss our upcoming article (#44) “Taking Better Photos of Your Cakes for Social Media.”
Practice Makes Progress
Getting truly smooth sides and sharp edges takes practice. Don’t get discouraged if your first few attempts aren’t flawless. Frosting can always be scraped off and reapplied. With each cake, your hand will grow steadier, and your eye sharper.
You can even practice with a dummy cake (styrofoam rounds) and buttercream to build muscle memory.
From Smooth to Spectacular
A cake with clean lines and perfect edges becomes the ideal base for any style — rustic, modern, whimsical, or elegant. Combined with techniques from other articles like drip application (#34), homemade fillings (#23), or natural decorations (#38), your cakes will not only taste amazing but look stunning too.
In our next article, we’ll explore another essential technique: “Layering Fillings Without Sinking or Leaking” (#36). If you’ve ever struggled with fillings bulging out or collapsing layers, you won’t want to miss it.