Starting your baking journey can feel overwhelming with so many gadgets, pans, and tools on the market. Do you really need a mixer? What kind of spatula works best? Is a cake tester necessary? The truth is, you don’t need a fancy kitchen or a hundred accessories to bake great cakes—just the right essentials.
This article covers the must-have tools for any beginner baker who wants to make beautiful, consistent, and delicious cakes from scratch. Whether you’ve already baked your first cake or are just gathering supplies, this guide will help you build your baking toolkit one smart step at a time.
Let’s begin with the most basic and versatile item: the mixing bowl. You’ll want at least two or three bowls in different sizes. Stainless steel and glass are great because they don’t retain odors or stains, and they’re microwave-safe if you need to melt ingredients like butter or chocolate. Plastic bowls are fine too, as long as they’re sturdy.
Next is the whisk. A balloon whisk is your go-to tool for mixing dry ingredients, beating eggs, or combining wet ingredients like milk and oil. It’s ideal for when you don’t want to overmix your batter, and it helps incorporate air into your mixture. If you’re not using a mixer, a good whisk is essential for fluffier cakes.
Measuring cups and spoons come right after. Precision is key in baking, so invest in both dry and liquid measuring sets. Dry measuring cups are used for flour, sugar, and cocoa powder, while liquid measuring cups (usually glass or plastic with spouts) are for milk, oil, or water. Always level your dry ingredients with a knife to avoid excess.
A rubber spatula is one of the unsung heroes of baking. It’s perfect for scraping every bit of batter from the bowl, folding whipped egg whites, and smoothing the surface of your cake in the pan. Choose a heat-resistant silicone one that won’t warp or absorb flavors.
When it comes to pans, start with a reliable 8- or 9-inch round cake pan. This is the most common size used in beginner recipes. Aluminum pans conduct heat evenly and are usually non-stick. Eventually, you can add a loaf pan, cupcake tin, and bundt pan to expand your possibilities. Always grease and flour your pans or use parchment paper to prevent sticking.
An electric mixer—either hand-held or stand—isn’t absolutely necessary, but it’s extremely helpful. Creaming butter and sugar by hand is possible, but it takes time and energy. A mixer saves effort and improves consistency, especially when whipping egg whites or making thick batters. If you’re just starting, a hand mixer is more affordable and takes up less space.
An oven thermometer is an often-overlooked essential. Many ovens are inaccurate, and even a 10–15°C variation can ruin a cake. Place the thermometer inside your oven to verify the actual temperature. This simple tool helps ensure your cake bakes evenly and doesn’t burn or undercook.
Don’t forget the cooling rack. After baking, it’s important to allow airflow underneath the cake to prevent sogginess. Place the cake (still in the pan) on the rack for 10 minutes, then remove it to cool completely. A wire rack promotes even cooling and helps your cake maintain its structure.
A serrated cake knife or cake leveler becomes useful once you start layering or decorating. It allows you to trim the top of a domed cake and slice it cleanly without crushing the crumb. Even for simple cakes, a sharp knife makes serving easier and cleaner.
Cake testers or toothpicks are small but mighty tools. They help you check whether the cake is fully baked without guessing. Insert into the center of the cake; if it comes out clean or with a few dry crumbs, your cake is done. No more underbaked centers or overbaked edges.
For decorating, you can begin with a simple offset spatula for spreading icing smoothly. It gives you better control than a regular knife and helps achieve a professional finish. A piping bag with a few basic nozzles is great for simple borders or writing. You don’t need elaborate skills—just consistency and practice.
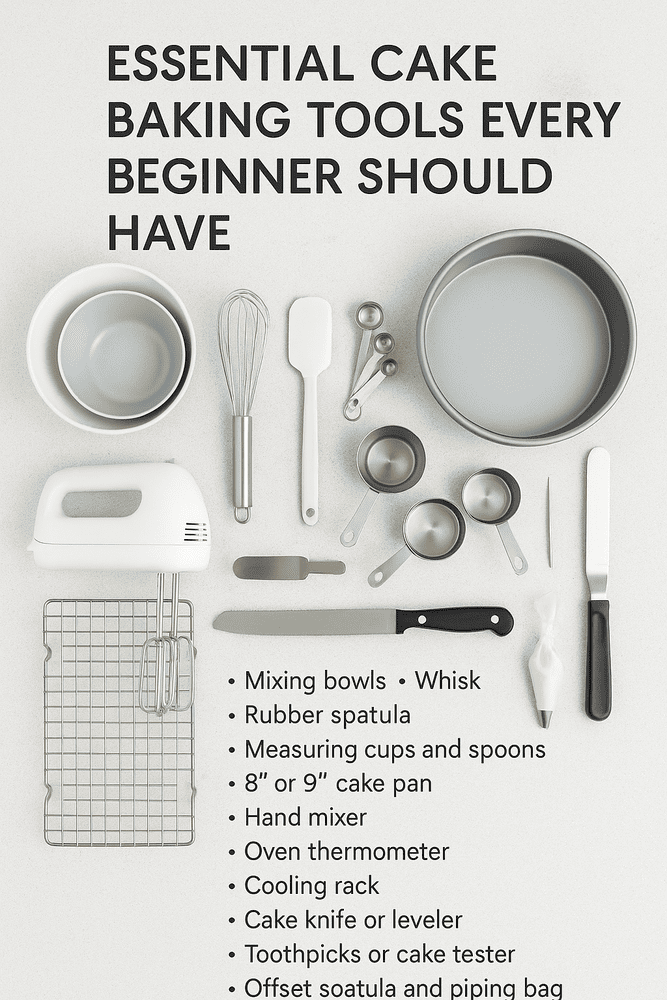
Here’s a summarized starter checklist:
- Mixing bowls (2–3 sizes)
- Whisk
- Rubber spatula
- Measuring cups and spoons
- 8″ or 9″ cake pan
- Hand mixer (optional but useful)
- Oven thermometer
- Cooling rack
- Cake knife or leveler
- Toothpicks or cake tester
- Offset spatula and piping bag (for decorating)
Bonus items you may grow into:
- Sifter for flour and powdered sugar
- Kitchen scale for precision
- Pastry brush for applying syrup or glaze
- Turntable for easier decorating
Remember, it’s better to invest in a few high-quality tools than buy everything at once. As you bake more, you’ll discover your preferences and add tools that suit your style.
Having the right tools doesn’t make you a perfect baker—but it certainly makes things smoother, faster, and more enjoyable. Each time you bake, you’ll understand how and why each item matters. Eventually, using them will become second nature.
If you’ve already followed our guide on “How to Make Your First Cake from Scratch,” this article helps you prepare your kitchen to go even further. And once you’ve built your toolkit, you’ll be ready to explore more advanced techniques like frosting, layering, or even themed decorations.
Let’s make baking fun, simple, and stress-free—from the first bowl to the final slice.